Building a Draw Something clone in .NET MAUI
by Shaun Lawrence
This post is part of the MAUI UI July community series of blog posts and videos, hosted by Matt Goldman. Be sure to check out the other posts in this series!
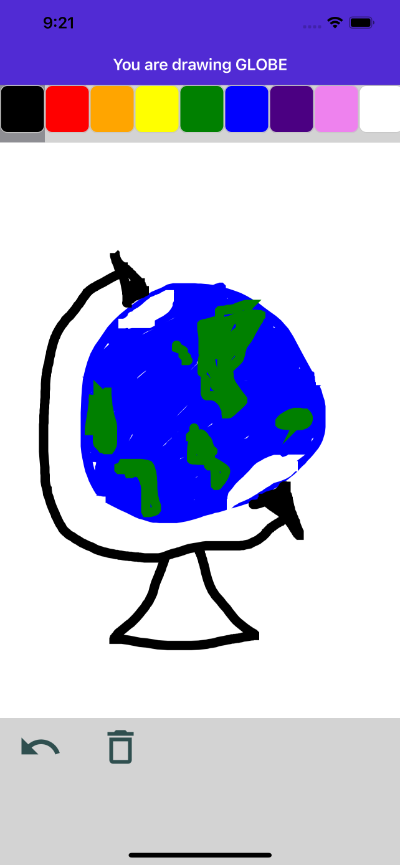
The plan for this post is to show how we can build a clone of the drawing game “Draw Something”.
What we will be covering
- How to provide the color selection toolbar.
- How to implement the drawing surface with .NET MAUI Graphics.
- How to provide the bottom bar with clear and undo.
Prerequisites
We have a bit of groundwork to do before we can build those 3 items so let’s go ahead and do that first.
Create our Project
First things first we need to create a .NET MAUI project - I am going to assume you know how to do this but if not then the Microsoft Docs page on Getting Started should have you covered.
I have chosen the project name of DrawSomething.
Create our ViewModel
I have chosen the name GamePageViewModel for this and I have located it under a folder called ViewModels in case we eventually decide to add more.
namespace DrawSomething.ViewModels;

public class GamePageViewModel
{
    public string Subject { get; } = "GLOBE";

    public IList<Color> AvailableColors { get; } = new List<Color>
    {
        Colors.Black,
        Colors.Red,
        Colors.Orange,
        Colors.Yellow,
        Colors.Green,
        Colors.Blue,
        Colors.Indigo,
        Colors.Violet,
        Colors.White
    };
}
You may be noticing that our view model doesn’t implement INotifyPropertyChanged and therefore doesn’t update the UI when values change. OK I’ll admit I have cheated a little here and decided not to update the UI, the bindings will work fine on their first use but won’t receive updates if they are changed in the view model. Perhaps this could be a little extra assignment for you ;).
Create our Page
I ripped out MainPage and created a new page called GamePage located under a folder called Pages.
<?xml version="1.0" encoding="utf-8" ?>
<ContentPage
    xmlns="http://schemas.microsoft.com/dotnet/2021/maui"
    xmlns:x="http://schemas.microsoft.com/winfx/2009/xaml"
    xmlns:viewmodels="clr-namespace:DrawSomething.ViewModels"
    xmlns:controls="clr-namespace:DrawSomething.Controls"
    x:Class="DrawSomething.Pages.GamePage"
    x:DataType="viewmodels:GamePageViewModel"
    BackgroundColor="LightGray"
    Title="{Binding Subject, StringFormat='You are drawing {0}'}">

    <Grid RowDefinitions="*,10*,*,*">

    </Grid>
</ContentPage>
Update AppShell
We will need to update our AppShell.xaml file to point to this new GamePage rather than the old MainPage that we just deleted, it should now look like:
<?xml version="1.0" encoding="UTF-8" ?>
<Shell
    x:Class="DrawSomething.AppShell"
    xmlns="http://schemas.microsoft.com/dotnet/2021/maui"
    xmlns:x="http://schemas.microsoft.com/winfx/2009/xaml"
    xmlns:pages="clr-namespace:DrawSomething.Pages"
    Shell.FlyoutBehavior="Disabled">

    <ShellContent
        Title="Home"
        ContentTemplate="{DataTemplate pages:GamePage}" />

</Shell>
With the key changes being:
- Added the
xmlns:pages="clr-namespace:DrawSomething.Pages"namespace - Swapped the
ContentTemplatefromlocal:MainPagetopages:GamePage.
Set the BindingContext
We also need to set the BindingContext of our GamePage, I have opted for following best practices so we have two steps to follow:
- Open up GamePage.xaml.cs and modify the constructor to be:
public GamePage(GamePageViewModel gamePageViewModel)
{
    InitializeComponent();

    BindingContext = gamePageViewModel;
}
Register our implementations with DI
- Register our page and view model with the app builder so that
Shellcan create our page and its dependencies. Open upMauiProgram.csand add into theCreateMauiAppmethod:
builder.Services.AddTransient<GamePage>();
builder.Services.AddTransient<GamePageViewModel>();
Our page will be built with a Grid split into 4 rows - the first 3 covering the items on our list and the final one to just providing some padding without having to set fixed sizing options for the button icons.
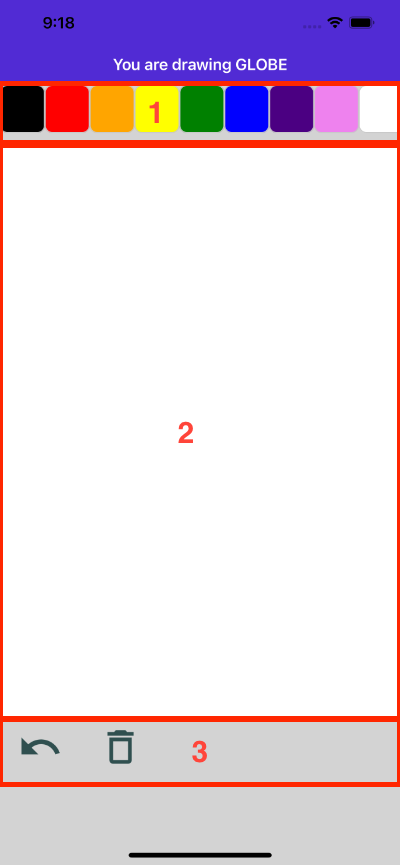
Let’s proceed to building each of those numbered components.
1. Creating the color selection bar
We will be using a CollectionView to build our color selection bar as it provides an easy way to layout the items as well as handle the selection for us.
In our GamePage we will want to add:
<CollectionView
    x:Name="ColorList"
    ItemsSource="{Binding AvailableColors}"
    SelectionMode="Single"
    ItemsLayout="HorizontalList">

    <CollectionView.ItemTemplate>
        <DataTemplate>
            <Grid WidthRequest="48">
                <Frame
                    BackgroundColor="{Binding}"
                    Margin="0,0,0,10" />
            </Grid>
        </DataTemplate>
    </CollectionView.ItemTemplate>
</CollectionView>
We leave a little Margin on the bottom of the Frame to make the selection more visible to the user.
2. Creating the drawing surface
This is the most involved part! First we need to create a control that encapsulates the drawing logic for us.
Creating the DrawingSurface control
We will be making use of the GraphicsView which is provided as part of .NET MAUI, this view allows us to render 2D graphics onto a drawable canvas. This is performed by the Drawable property which must implement the IDrawable interface - this provides the implementor with access to the canvas and dimensions to know how and where to draw. In order for us to inform the GraphicsView to redraw the contents of the canvas and ultimately call IDrawable.Draw we need to call Invalidate on the GraphicsView - if this isn’t completely clear don’t worry this should become clearer as we work through the example.
For this approach I have opted for a purely C# implementation as I found that XAML just added noise.
using System.Windows.Input;

namespace DrawSomething.Controls;

public class DrawingSurface : GraphicsView, IDrawable
{
    public DrawingSurface()
    {
        Drawable = this;
    }

    public void Draw(ICanvas canvas, RectF dirtyRect)
    {
        // Do our drawing here.
    }
}
That’s simple right? If only - now that we have a surface, we need to add an implementation to handle the drawing of lines. We need to provide:
- Ability to set the color.
- Ability to set the line thickness (we don’t set this in the app, but the door is open for you).
- Track the users interaction to create their drawing content.
- Keep track of the users drawing content.
- Render the drawing content on screen.
1. Ability to set the color
For this we need to create a BindableProperty so that when we add the DrawingSurface to our page we can bind to the selection in our color selection bar.
public static readonly BindableProperty DrawingColorProperty =
    BindableProperty.Create(
        nameof(DrawingColor),
        typeof(Color),
        typeof(DrawingSurface),
        Colors.Black);

public Color DrawingColor
{
    get => (Color)GetValue(DrawingColorProperty);
    set => SetValue(DrawingColorProperty, value);
}
2. Ability to set the line thickness
For this we need to create a BindableProperty so that when we add the DrawingSurface to our page we can bind to a way of setting the line thickness. Perhaps a Slider?
public static readonly BindableProperty LineThicknessProperty =
    BindableProperty.Create(
        nameof(LineThickness),
        typeof(float),
        typeof(DrawingSurface),
        10f);

public float LineThickness
{
    get => (float)GetValue(LineThicknessProperty);
    set => SetValue(LineThicknessProperty, value);
}
3. Track the users interaction to create their drawing content
The GraphicsView provides us with the ability to monitor the user’s interaction with the control based on events with Interaction in the name (e.g. StartInteraction, DragInteraction, EndInteraction).
In our DrawingSurface constructor we want to add:
DragInteraction += DrawingSurface_DragInteraction;
StartInteraction += DrawingSurface_StartInteraction;
EndInteraction += DrawingSurface_EndInteraction;
And then the methods that will be called:
private void DrawingSurface_DragInteraction(object sender, TouchEventArgs e)
{
}

private void DrawingSurface_EndInteraction(object sender, TouchEventArgs e)
{
}

private void DrawingSurface_StartInteraction(object sender, TouchEventArgs e)
{
}
These event handlers provide us with the ability to keep track of the users interaction.
> “WARNING: we have subscribed to the interaction events but we haven’t unsubscribed, this is safe in this example because the page lives for the life of the application. I would strongly advise unsubscribing whenever your object is at the end of its life.”
4. Keep track of the users drawing content
We are going to treat each time the user starts interacting (puts the finger on the screen or clicks down on the mouse) through to the time they end interacting (lifts their finger off the screen or mouse) with the surface as a single line or path.
.NET MAUI Graphics provides us with the PathF struct that represents a collection of points which we can draw onto the canvas in the Draw method but we also need to know which color and how thick this path will be. So we are going to create a class to encapsulate the details of each path:
namespace DrawSomething;

public class DrawingPath
{
    public DrawingPath(Color color, float thickness)
    {
        Color = color;
        Thickness = thickness;

        Path = new PathF();
    }

    public Color Color { get; }
    public PathF Path { get; }
    public float Thickness { get; }

    public void Add(PointF point) => Path.LineTo(point);
}
Then in our DrawingSurface class we need to add a few key bits:
Fields to store the current interaction as well as the previous interactions:
private DrawingPath currentPath;
private readonly IList<DrawingPath> paths = new List<DrawingPath>();
Next we need to record the starting interaction, so let’s fill our the body of the DrawingSurface_StartInteraction method:
private void DrawingSurface_StartInteraction(object sender, TouchEventArgs e)
{
    currentPath = new DrawingPath(DrawingColor, LineThickness);
    currentPath.Add(e.Touches.First());
    paths.Add(currentPath);

    Invalidate();
}
Here we record the currently selected color and line thickness, grab the first touch that is available from the interaction TouchEventArgs. Note this touch interaction supports multi-touch should you require - perhaps to allow for gestures such as zooming/panning. Finally we add the current path to our collection of paths purely to reduce the complexity of our drawing code.
Now let’s handle the user moving their finger or mouse around through the DrawingSurface_DragInteraction method:
private void DrawingSurface_DragInteraction(object sender, TouchEventArgs e)
{
    currentPath.Add(e.Touches.First());

    Invalidate();
}
And finally we need to handle the scenario when the user has finished interacting with the surface in the DrawingSurface_EndInteraction method:
private void DrawingSurface_EndInteraction(object sender, TouchEventArgs e)
{
    currentPath.Add(e.Touches.First());

    Invalidate();
}
It is worth highlighting the use of the Invalidate method in this and each of the above event handlers. As mentioned earlier on the call to Invalidate will cause our IDrawable.Draw method to be called and ultimately allow us to draw the content.
5. Render the drawing content on screen
Our final step in section Creating the DrawingSurface control is to perform the drawing. Inside our Draw method we want to add the following:
public void Draw(ICanvas canvas, RectF dirtyRect)
{
    foreach (var path in paths)
    {
        canvas.StrokeColor = path.Color;
        canvas.StrokeSize = path.Thickness;
        canvas.StrokeLineCap = LineCap.Round;
        canvas.DrawPath(path.Path);
    }
}
This allows us to loop through all of the interactions that we have recorded by the user and display the result.
Using our DrawingSurface control
Now that we have a control we need to actually use it! This is the second row in the Grid in our GamePage so you can guess where our next destination is…
Let’s open up the GamePage.xaml file and add the following inside the Grid and below our color selection bar:
<controls:DrawingSurface
    Grid.Row="1"
    x:Name="DrawingSurface"
    BackgroundColor="White"
    DrawingColor="{Binding SelectedItem, Source={x:Reference ColorList}}"/>
Due to the power of bindings we don’t need to create a property on our view model for both the color selection and the drawing surface to bind to and keep in sync - we can simply bind the DrawingColor property of our DrawingSurface control to the SelectedItem property on the control called ColorList. This really helps to keep the view related information out of the view model and reduce the code that we write.
3. Creating the bottom toolbar
The final part of our build is to add in the functionality to clear the surface or undo the last action.
For this we first need to add the ability to perform these functions on the DrawingSurface and then link to them in the page.
Add the commands
Let’s open up our DrawingSurface.cs file and do that. We need to add:
public static readonly BindableProperty ClearCommandProperty =
    BindableProperty.CreateReadOnly(
        nameof(ClearCommand),
        typeof(ICommand),
        typeof(DrawingSurface),
        default,
        BindingMode.OneWayToSource,
        defaultValueCreator: CreateClearCommand).BindableProperty;

public ICommand ClearCommand => (ICommand)GetValue(ClearCommandProperty);

static object CreateClearCommand(BindableObject bindable)
    => new Command(() => ((DrawingSurface)bindable).Clear());

private void Clear()
{
    paths.Clear();

    Invalidate();
}
This looks a bit different to the other bindable properties we created so let’s see what is going on:
We have created a ClearCommand property that when execute will call the Clear method on our DrawingSurface. This is the opposite of the common interactions that we see with commands, usually the flow is from the source (view model) to the target (view), for example the Button.Command will call code in our view model.
Our approach is achieved by:
- defining the default binding mode to be
BindingMode.OneWayToSource- further reading. - only providing a
getfor ourClearCommandproperty. - calling
BindableProperty.CreateReadOnlyto create a read-only property.
> “I have opted to not implement the UndoCommand here but it would largely be a repeat of the ClearCommand implementation - perhaps you can give it a go? Or failing that check out the final source linked at the end.”
Add the images
For the icons on our buttons I used the following from Google Fonts:
Note that I did not just drop these into the \Resources\Images folder as they would come out with the pre-supplied color, I managed to make use of the magical TintColor settings to change the color of the images without having to open an image editor. For more information on what can be achieved check out the Microsoft Docs.
To achieve this we need to:
- Add the files to the
Resourcesfolder - Include these files in our
DrawSomething.csprojfile
<ItemGroup>
    <MauiImage Include="Resources\clear.svg" TintColor="DarkSlateGray" />
    <MauiImage Include="Resources\undo.svg" TintColor="DarkSlateGray" />
</ItemGroup>
You can add these into any ItemGroup already in the project file and I opted to include with the image related ones.
Build the bottom toolbar
Now that we have our images and the functionality in the DrawingSurface control we can add the Buttons to work the magic. Inside our GamePage.xaml file we want to add the third rows contents as:
<HorizontalStackLayout Grid.Row="2">

    <Button
        ImageSource="undo.png"
        BackgroundColor="LightGray"
        Command="{Binding UndoCommand, Source={x:Reference DrawingSurface}}"/>

    <Button
        ImageSource="clear.png"
        BackgroundColor="LightGray"
        Command="{Binding ClearCommand, Source={x:Reference DrawingSurface}}"/>

</HorizontalStackLayout>
Note that despite providing files like undo.svg we actually refer to them as undo.png this is because the tooling converts the svg file over to multiple different png files to suit the various platforms that our app will deploy to.
Time to draw
There we have it! The ability for me to create some terrible drawings.

Please feel free to send me your drawings ;) or to simply reach out, I am on twitter Bijington.
Summary
I would like to point out that the .NET MAUI Community Toolkit does actually offer a DrawingView control that will provide the functionality that we have implemented in our DrawingSurface control.
My motivation for not using that control in this post was to provide an overview of using .NET MAUI Graphics. If you have enjoyed this then I thoroughly recommend checking out all of the possibilities that the Graphics offers because we have only just touched the surface. The Microsoft Docs pages provide a good insight. Or failing that come and check out the fun I am having trying to use .NET MAUI Graphics in building a lightweight 2D Game Engine over on GitHub.
Links
The source for this creation can be found at:
tags: C# - maui - graphics - MauiUiJuly