Creating a Wheel of names clone
by Shaun Lawrence
This post is part of the MAUI UI July community series of blog posts and videos, hosted by Matt Goldman. Be sure to check out the other posts in this series!
This years concept takes inspiration from a .NET MAUI event that I was lucky enough to help host in London on 14th March 2025 - we used the website https://wheelofnames.com to award prizes to attendees and when one attendee asked if it was built with .NET MAUI the challenge was set! Also for those of you interested there will be another .NET MAUI Day event in London in 2026 so watch this space…
The result of this blog post will be to:
- Create a reusable control
- Make use of .NET MAUI GraphicsView control to provide the custom rendering
- Make use of animations to provide the spinning mechanism
Creating our .NET MAUI application
I am going to assume that you know how to do most of this so I will keep this section rather short by running through the dotnet console commands.
I am assuming that you have at least the following versions installed:
- .NET SDK 9.0.302
- .NET MAUI 9.0.80
To create our application we can open a terminal window, cd to the location on disk and run:
dotnet new maui -o WheelOfNames
This will create a .NET MAUI project called WheelOfNames inside a folder of the same name.
Install our required dependencies
We will also be using both CommunityToolkit.Maui and CommunityToolkit.Mvvm to make our life easier. So let’s add them now by first cd into the WheelOfNames folder and then running:
dotnet package add CommunityToolkit.Maui
and
dotnet package add CommunityToolkit.Mvvm
This now gives us a rather empty application which we can turn into our wheel. Before we jump into writing code I wanted to introduce you to .NET MAUI Graphics.
Introducing .NET MAUI Graphics
.NET MAUI Graphics is one of my favourite topics! I am currently exploring the idea of building a game engine on top of it given the amount of power it already offers. If you are interested in the game engine then please feel free to check out the repository on GitHub at https://github.com/bijington/orbit.
It has the potential to offer the ability for so much to be achieved, things like rendering chart controls or other fancy concepts all through a cross-platform API meaning we only really need to focus on the problems we are trying to solve and not worry about each individual platform.
Essentially .NET MAUI Graphics offers us with a surface that can render pixel perfect graphics on any platform supported by .NET MAUI. We should consider .NET MAUI Graphics as an abstraction layer, like .NET MAUI itself, on top of the platform specific drawing libraries. So we get all the power of each platform but with a simple unified .NET API that we as developers can work with.
What it offers
.NET MAUI gives us the GraphicsView which we can use to draw shapes on the screen. We need to assign the Drawable property on the GraphicsView with an implementation that can know how to draw. This implementation must implement the IDrawable interface which defines a Draw method.
In order to trigger the application or GraphicsView to update what is rendered on screen we must call the Invalidate method on the GraphicsView. This will then cause the IDrawable.Draw method to be invoked and our code will be given the chance to update the canvas.
Let’s proceed to seeing this in action.
Creating our reusable control
The first thing to do is to create a new control inside our application, I have just added a new class file with the name WheelView and then modified it to inherit from GraphicsView and also to make the class implement IDrawable:
using System.Collections;
using System.Collections.Specialized;
using System.Security.Cryptography;
using System.Windows.Input;
using CommunityToolkit.Maui.Core.Extensions;

namespace WheelOfNames;

public class WheelView : GraphicsView, IDrawable
{
    public WheelView()
    {
        Drawable = this;
    }

    public void Draw(ICanvas canvas, RectF dirtyRect)
    {
    }
}
Before we can fill in the Draw method our control will need to provide the following functionality:
- A way to provide the list of names
- A way to trigger the wheel to spin
- A way to be notified of the selected winner
So let’s proceed to making each of those possible.
A way to provide the list of names
We do this by introducing a bindable property called ItemsSource, this makes it feel familiar to controls like CollectionView, etc. now we could all the property Names instead but I like the idea of extending this later on in life to allow developers to customise the segments in the wheel. We will do this in stage because what seems like a simple property addition in our class will result in a LOT of code being added.
First we add a backing field
private IList<string> names = [];
Then we add our bindable property - we are using IEnumerable to make it possible for developers to pass in any kind of collection (we could tighten this to collections of strings but again I like the idea of potentially making this more advanced).
public static readonly BindableProperty ItemsSourceProperty =
    BindableProperty.Create(nameof(ItemsSource), typeof(IEnumerable), typeof(WheelView), null, propertyChanged: OnItemsSourcePropertyChanged);

public IEnumerable? ItemsSource
{
    get => (IEnumerable)GetValue(ItemsSourceProperty);
    set => SetValue(ItemsSourceProperty, value);
}
Then we add a property changed delegate - this will get called each time the value for ItemsSource is changed.
private static void OnItemsSourcePropertyChanged(BindableObject bindable, object? oldValue, object? newValue)
{
    if (bindable is WheelView wheelView)
    {
        wheelView.HandleItemsSourcePropertyChanged(oldValue, newValue);
    }
}
The previous method was static and we usually need to bridge the gap between something static and call a method on an actual instance - thankfully the bindable parameter in the previous method is the instance we are interested in.
private void HandleItemsSourcePropertyChanged(object? oldValue, object? newValue)
{
    if (oldValue is INotifyCollectionChanged oldNotifyCollectionChanged)
    {
        oldNotifyCollectionChanged.CollectionChanged -= NotifyCollectionChangedOnCollectionChanged;
    }

    if (newValue is IEnumerable<string> stringEnumerable)
    {
        UpdateNames(stringEnumerable.ToList());
    }

    if (newValue is INotifyCollectionChanged notifyCollectionChanged)
    {
        notifyCollectionChanged.CollectionChanged += NotifyCollectionChangedOnCollectionChanged;
    }
}
One challenge of allowing anything that implements IEnumerable means that it is possible for developers to provide an instance of ObservableCollection<T>, this class also implements the INotifyCollectionChanged interface which allows for developers to notify other implementations that their collection has changed in some way. For our purposes we only care about when something is added to or removed from the collection so we can implement the following:
private void NotifyCollectionChangedOnCollectionChanged(object? sender, NotifyCollectionChangedEventArgs e)
{
    switch (e.Action)
    {
        case NotifyCollectionChangedAction.Add:
            if (e.NewItems is not null &&
                e.NewItems.Count > 0 &&
                e.NewItems[0] is string newName)
            {
                names.Insert(e.NewStartingIndex, newName);
            }
            break;

        case NotifyCollectionChangedAction.Remove:
            names.RemoveAt(e.OldStartingIndex);
            break;

        case NotifyCollectionChangedAction.Replace:
            break;

        case NotifyCollectionChangedAction.Move:
            break;

        case NotifyCollectionChangedAction.Reset:
            break;

        default:
            throw new ArgumentOutOfRangeException();
    }

    this.UpdateNames(names);
}
Finally the call to UpdateNames will serve as a mechanism to signal to the graphics layer that the control needs to be redrawn. Don’t worry we will add this method shortly.
A way to trigger the wheel to spin
I mentioned at the beginning that we will be using Animations to control the spinning mechanism and while we won’t be adding the animations right now it is important for this part of the code change. We will be adding a Command to our control to allow callers to trigger the spin behaviour and to know whether a spin can take place we can check whether there are any existing animations running - this works well to guard against multiple executions of our spin method. Let’s proceed again in a step-by-step process:
First we add a constant for the name of our animation
private const string AnimationName = "SpinWheel";
Then we add a readonly bindable property - this is very important because we don’t want developers setting the value for our command. We just want to allow them to bind to it to make their MVVM application happy. We do this as follows:
public static readonly BindableProperty SpinCommandProperty =
    BindableProperty.CreateReadOnly(nameof(SpinCommand), typeof(ICommand), typeof(WheelView), default, BindingMode.OneWayToSource, defaultValueCreator: CreateSpinCommand).BindableProperty;

public ICommand SpinCommand
{
    get => (ICommand)GetValue(SpinCommandProperty);
}

static Command CreateSpinCommand(BindableObject bindable)
{
    var wheelView = (WheelView)bindable;
    return new Command(() => wheelView.Spin(), () => wheelView.AnimationIsRunning(AnimationName) is false);
}

private void Spin()
{

}
You will notice the use of the defaultValueCreator parameter, this allows us to create a new instance of the command for each instance of the WheelView and then we determine the action and whether the command can be executed. We do the latter through the use of the AnimationIsRunning extension method that is provided by .NET MAUI - it allows us to check whether any animations with a specific name on the current view are currently running. Then we have the Spin method which we will populate later.
A way to be notified of the selected winner
For this feature we will also use an ICommand but we will do it in the typical way that you would interact with one as a consumer - we will allow the developer to provide the action and bind it to our control.
public static readonly BindableProperty NameSelectedCommandProperty =
    BindableProperty.Create(nameof(NameSelectedCommand), typeof(ICommand), typeof(WheelView), null);

public ICommand? NameSelectedCommand
{
    get => (ICommand)GetValue(NameSelectedCommandProperty);
    set => SetValue(NameSelectedCommandProperty, value);
}

public event Action<string>? NameSelected;
We also add an event just to make something work (you might argue this is lazy and I would probably agree with you :).
Draw our names
You may have noticed that we didn’t provide an UpdateName method earlier on, this wasn’t a mistake as it just felt right to do it now.
private void UpdateNames(IList<string> newNames)
{
    this.names = newNames;
    angle = 360f / names.Count;

    this.Invalidate();
}
The above code shouldn’t look unfamiliar, the only new part if the concept of setting an angle - we are basically working out the angle per name to know how to render each segment.
We haven’t defined the angle field and we need to add some more so let’s do that now
private readonly IList<Color> colors = [Colors.Chartreuse, Colors.Blue, Colors.Green, Colors.Red, Colors.DeepPink];
private float angle;
private float rotation;
I have gone with a hardcoded set of colours but I am sure you could quite easily extend this to be provided.
Now we are finally ready to write the code to draw each name in our wheel, before we do I should state the following:
- We will apply a padding from the edge of the wheel to the edge of a segment
- We will cycle through the
colormentioned above - We will render a white circle in the middle of the wheel to look like an axle
Let’s proceed to adding code into the Draw method in stages:
First we initialise some variables and work out the radius of our rendered circle. Note that the dirtyRect parameter is the rendered size of your view.
int colorIndex = 0;
float padding = 10f;
var radius = Math.Min(dirtyRect.Height / 2, dirtyRect.Width / 2) - padding * 2;
Next we take a copy of the current rotation this is currently initialised to 0 and its use may only make sense once we implement the spinning animation - we will essentially control the value of rotation to render the animation.
float startAngle = rotation;
We also want to cache some other values to make our calculations easier.
PointF center = dirtyRect.Center;

RectF rect = new RectF(
    center.X - radius,
    center.Y - radius,
    radius * 2,
    radius * 2);
Finally we start to render something, the aim here is to enumerate through each name in the list and render the segment
foreach (var name in names)
{
    float sweepAngle = angle;

    // First we render the coloured segment - we do this by drawing an arc and then filling it.
    var path = new PathF();
    // The origin of the canvas is top/left so we first move to the center
    path.MoveTo(center);
    path.AddArc(rect.Left, rect.Top, rect.Right, rect.Bottom, startAngle, startAngle - sweepAngle, true);
    path.Close();

    canvas.FillColor = colors[colorIndex];
    canvas.StrokeSize = 2;
    canvas.StrokeColor = Colors.White;

    canvas.DrawPath(path);
    canvas.FillPath(path);

    canvas.FontColor = colors[colorIndex].ToBlackOrWhiteForText();
    canvas.FontSize = 30;

    // Save the save so we can undo the transformation and rotation.
    canvas.SaveState();
    canvas.Translate(center.X, center.Y);
    canvas.Rotate(360 - (startAngle - (angle / 2)));
    canvas.DrawString(name, 0, -radius / 4, radius - padding, radius / 2, HorizontalAlignment.Right, VerticalAlignment.Center);

    // Remove the transformation and rotation.
    canvas.RestoreState();

    // Bump the indexes for the next segment.
    colorIndex = (colorIndex + 1) >= colors.Count ? 0 : colorIndex + 1;
    startAngle += sweepAngle;
}

// Render the white circle
canvas.FillColor = Colors.White;
var innerCircleRadius = radius / 4;
canvas.FillEllipse(
    dirtyRect.Center.X - innerCircleRadius / 2,
    dirtyRect.Center.Y - innerCircleRadius / 2,
    innerCircleRadius,
    innerCircleRadius);
Hopefully the comments draw attention to what the code is doing. The key thing to note is that operations performed on the canvas are done so in a stack based manner so it is easy to stack up things like a Transform and Rotation to make the maths required to render text rotated around a set of axes pretty straightforward. It doesn’t mean I didn’t bash my head over the keyboard a large number of times working out why things didn’t render in the right place though :D.
I also want to draw attention to the line of code canvas.FontColor = colors[colorIndex].ToBlackOrWhiteForText(); this is a really great extension method provided by the .NET MAUI Community Toolkit that enables us to choose a text colour between black and white which will have the highest contrast ratio to the supplied Color which is the background.
The following image should hopefully help to provide some extra context into how we draw the segments.
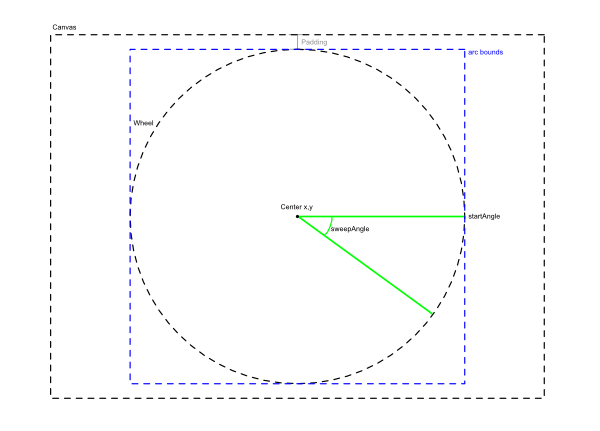
We can say that the bounds for our wheel or ‘arc bounds’ in the above image is the area in which we draw our arc and we pass these bounds in as the first 4 parameters to AddArc. Next we need to pass in an angle called startAngle in our diagram and code - this is initially 0 degrees so will render as you see in the image, then with each segment drawn we increment the value by the size of a segment angle (or the angle field in our code). Then we have to provide the sweepAngle and this is the angle in which to render the curve which is handily the size of a segment angle (or the angle field in our code). Finally we pass in whether to draw the arc clockwise or anti-clockwise.
Spin our wheel
The final bit of code that we need to add into our WheelView class is the method to allow it to Spin.
private void Spin()
{
    Animation animation = new Animation();

    // Determine the random winning position and number of spins.
    var finalAngle = RandomNumberGenerator.GetInt32(0, 360);
    var numberOfSpins = RandomNumberGenerator.GetInt32(3, 7);
}
The next bits we will add individually because I feel they need explaining.
We created an instance of the Animation class and this is a really cool thing to work with. We can basically use it to update a numerical value over time based and we can do it by adding multiple frames into the sequence. For our scenario it is pretty simple we ‘just’ add the following:
animation.Add(
    beginAt: 0.0, // 0% of the sequence
    endAt: 1.0, // 100% of the sequence
    new Animation(
        v => // A callback providing you with the updated value for the value being animated, in our case this is the rotation field.
        {
            rotation = (float)v;

            this.Invalidate();
        },
        start: rotation, // the starting value
        end: finalAngle + (360 * numberOfSpins))); // the final value
Once we have created an animation we need to call Commit to start it running. We can do this as follows:
animation.Commit(
    owner: this,
    AnimationName,
    rate: 16, // called every 16 milliseconds
    length: 10_000, // run for 10 seconds
    Easing.CubicInOut, // Easings allows us to control how the animation begins and ends.
    finished: (value, finished) => // a callback for when we have finished
    {
        var winningIndex = (int)(finalAngle / angle);

        var winningName = names[winningIndex];

        this.NameSelected?.Invoke(names[winningIndex]);

        if (NameSelectedCommand is not null && NameSelectedCommand.CanExecute(winningName))
        {
            NameSelectedCommand.Execute(winningName);
        }
    });
I would thoroughly recommend playing around with different Easing values.
Using our control
Inside the MainPage.xaml file in the application we can replace it with the following:
<?xml version="1.0" encoding="utf-8" ?>
<ContentPage xmlns="http://schemas.microsoft.com/dotnet/2021/maui"
             xmlns:x="http://schemas.microsoft.com/winfx/2009/xaml"
             xmlns:wheelOfNames="clr-namespace:WheelOfNames"
             x:Class="WheelOfNames.MainPage"
             x:DataType="wheelOfNames:MainPageViewModel"
             Shell.NavBarIsVisible="False">

    <Grid ColumnDefinitions="5*,*">
        <wheelOfNames:WheelView
            x:Name="Wheel"
            ItemsSource="{Binding Names}"
            NameSelectedCommand="{Binding NameSelectedCommand}"
            NameSelected="Wheel_OnNameSelected">
            <wheelOfNames:WheelView.GestureRecognizers>
                <TapGestureRecognizer Command="{Binding SpinCommand, Source={x:Reference Wheel}}" />
            </wheelOfNames:WheelView.GestureRecognizers>
        </wheelOfNames:WheelView>

        <Border Grid.Column="1">
            <Grid RowDefinitions="Auto,*">
                <Label Text="Names" />
                <Editor
                    Grid.Row="1"
                    Text="{Binding NameText}" />
            </Grid>
        </Border>
    </Grid>

</ContentPage>
This results in adding our WheelView into the page and also an Editor to allow the user to add names to the wheel.
It is worth highlighting the use of the SpinCommand in the above XAML, you should notice that we bind the command from a TapGestureRecognizer straight onto the views SpinCommand property. This can provide a really neat way of keeping the view bits in the view and your view models nice and clean.
Inside the MainPage.xaml.cs file in the application we can replace it with the following:
namespace WheelOfNames;

public partial class MainPage : ContentPage
{
    public MainPage()
    {
        InitializeComponent();
        BindingContext = new MainPageViewModel();
    }

    private async void Wheel_OnNameSelected(string name)
    {
        await DisplayAlert("Today's post is by", name, "OK");
    }
}
Yes we could and should use DI for the view model to be passed in!
Finally we need to add a new class to the application and call it MainPageViewModel this will be the backing view model for our MainPage.
The contents can be modified to the following:
using System.Collections.ObjectModel;
using CommunityToolkit.Mvvm.ComponentModel;
using CommunityToolkit.Mvvm.Input;

namespace WheelOfNames;

public partial class MainPageViewModel : ObservableObject
{
    [ObservableProperty]
    private string? nameText = string.Empty;

    [ObservableProperty]
    private ObservableCollection<string> names = [];

    partial void OnNameTextChanged(string? value)
    {
        if (value is null)
        {
            Names = [];
            return;
        }

        Names = new ObservableCollection<string>(value.Split(
            [Environment.NewLine],
            StringSplitOptions.RemoveEmptyEntries
        ));
    }

    [RelayCommand]
    private void NameSelected(string name)
    {
        this.Names.Remove(name);
    }
}
Hopefully most of the above doesn’t look too complex - we are using a lot of value from the CommunityToolkit.Mvvm package to remove all of the INotifyPropertyChanged boilerplate code. With the source generation it provides for the ObservableProperty attributes it generates partial methods that we can implement to handle when a property value changes which is very neat.
I should add that this code might not be the most efficient as it recreates the ObservableCollection each time the text changes - there could be ways to improve this but for the examples that I have used I think the names in the wheel will become impossible to read before the performance of rendering the wheel becomes an issue.
That concludes this post. Let’s take another look at the control in action.
Conclusion
The final result of this can be found up on the Wheel of name repository.
I hope this helps to show off what fun and creative things you can do with .NET MAUI. If you have a desire to get involve then please feel free to contribute to the repository or let me know what you are working on.
tags: C# - maui - games - MauiUiJuly - MauiGraphics