Building a sliding puzzle game in .NET MAUI - Part six
by Shaun Lawrence
This post is part of the Building a sliding puzzle game in .NET MAUI series that is aimed at guiding you through building a simple sliding puzzle game in .NET MAUI.
This post is also part of the MAUI UI July community series of blog posts and videos, hosted by Matt Goldman. Be sure to check out the other posts in this series!
What we will be covering in this post
- Creating our game page
- Registering our page
- Navigating to our new page
- Adding the completion logic
- Taking our application for a test drive
Creating our game page
The result of this post will allow our users to actually play the game and experience the frustration that I constantly do when trying to complete these levels.
Creating the LevelPage
- Right click on the Pages folder
- Click on
Add>New File... - Click on
.NET MAUIin the left hand pane. - Click on
.NET MAUI ContentPage (XAML)in the right hand pane. - Enter the name LevelPage
- Click on
Add
We should now have a new XAML file open within Visual Studio. We can replace the contents with the following:
<?xml version="1.0" encoding="utf-8" ?>
<ContentPage
    xmlns="http://schemas.microsoft.com/dotnet/2021/maui"
    xmlns:x="http://schemas.microsoft.com/winfx/2009/xaml"
    xmlns:local="clr-namespace:Puzzler"
    x:Class="Puzzler.Pages.LevelPage">
    <Grid
        RowDefinitions="Auto,Auto,*">

        <Label
            x:Name="TitleLabel"
            FontSize="Title"
            HorizontalOptions="Center" />

        <Label
            x:Name="SubtitleLabel"
            Grid.Row="1"
            HorizontalOptions="Center"
            FontSize="Subtitle" />

        <local:SlidingTileGrid
            x:Name="SlidingTiles"
            HorizontalOptions="Center"
            VerticalOptions="Center"
            Grid.Row="2" />
    </Grid>
</ContentPage>
The aim is to keep our game page clean and simple, for this we simply show the title and a subtitle; these will consistent of the name and difficulty respectively, and then we have our SlidingTileGrid control in the bottom row. If we were building a more complete application we will want to add in a pause/menu button to allow the user to leave the current level. For now though they have to finish the level.
Modifying the LevelPage.xaml.cs file
Open up your LevelPage.xaml.cs file. It should be pretty empty. For now we just want to override the OnSizeAllocated method in order to calculate the best size for our sliding grid. Modifying the contents to match the following:
namespace Puzzler.Pages;

public partial class LevelPage : ContentPage
{
    public LevelPage()
    {
        InitializeComponent();
    }

    protected override void OnSizeAllocated(double width, double height)
    {
        base.OnSizeAllocated(width, height);

        if (width > 0)
        {
            var smallest = Math.Min(width, height);

            SlidingTiles.WidthRequest = smallest;
            SlidingTiles.HeightRequest = smallest;
        }
    }
}
We will return in the future sections to update more of our UI. First let’s move on to registering our page so that it can be navigated to.
Registering our page
In order for Shell to know how to navigate to our page we need to define the routing information. Let’s open up the MauiProgram.cs file and add the following lines into the CreateMauiApp method:
// Register the pages.
builder.Services.AddTransient<LevelPage>();

// Register the routes to the pages.
Routing.RegisterRoute(nameof(LevelPage), typeof(LevelPage));
We don’t technically need to register the LevelPage with builder.Services because our page does not have any dependencies, if we did change that it would result in an exception being thrown when attempting to navigate to the page.
Navigating to our new page
This section is more involved than in part five. We will be making use of the ability to pass in parameters when navigating so that we can pass the level that is selected in our LevelSelectionPage.
Accepting the navigation parameters
There are several ways to allow for the receiving of parameters, all of which can be found on the Microsoft documentation pages. For our scenario we are going to pass some complex data (our Level class) and therefore we are going to use the QueryPropertyAttribute.
Our first change will be in our LevelPage.xaml.cs file, so let’s open it up and making the following changes:
Add the property to be populated
Add the following property in our LevelPage class:
public Level Level { get; set; }
Mark the property to be populate when navigating
Add the following attribute onto the LevelPage class definition:
[QueryProperty(nameof(Level), nameof(Level))]
public partial class LevelPage : ContentPage
The first parameter we add to the QueryProperty attribute is the name of the property that we wish to populate and the second is the name that can be supplied when navigating. I have opted to use the same names here to hopefully make it easier to follow.
Overriding the OnNavigatedTo method
In order to make use of the Level property that is populated when navigating we can override the OnNavigatedTo method and use the value to update our UI as follows:
protected override void OnNavigatedTo(NavigatedToEventArgs args)
{
    base.OnNavigatedTo(args);

    TitleLabel.Text = Level.Name;
    SubtitleLabel.Text = Level.Difficulty.ToString();

    SlidingTiles.Level = Level;
}
The above method results in us using the value passed in when navigating and populating:
- A title of the level
- A subtitle showing the difficulty
- Our sliding tile grid with the level to be loaded
Now that we have the ability to handle the navigation and parameters passed into it we can proceed to writing the code to perform the actual navigation.
Handling the selection change
Our final change in this section is to handle the SelectionChanged event on our CollectionView and then navigate over to the LevelPage.
Let’s open our LevelSelectionPage.xaml.cs page and add the follow method:
private async void OnLevelsCollectionViewSelectionChanged(object sender, SelectionChangedEventArgs e)
{
    var level = e.CurrentSelection.FirstOrDefault();

    if (level is null)
    {
        return;
    }

    await Shell.Current.GoToAsync(nameof(LevelPage), new Dictionary<string, object>
    {
        [nameof(LevelPage.Level)] = level
    });

    // Clear the selection for when we navigate back nothing is selected.
    LevelsCollectionView.SelectedItem = null;
}
The above code first validates that something is selected, and if there is, passes that selected Level over to our new LevelPage through Shell navigation.
Finally we need to subscribe to the SelectionChanged event, the best option here is to subscribe in XAML to avoid memory leaks around unsubscribing of events, so let’s open up our LevelSelectionPage.xaml file and modify the following lines:
<CollectionView
    x:Name="LevelsCollectionView"
    SelectionMode="Single"
    Margin="50">
Change the above line to:
<CollectionView
    x:Name="LevelsCollectionView"
    SelectionMode="Single"
    SelectionChanged="OnLevelsCollectionViewSelectionChanged"
    Margin="50">
This now allows us to select an item in the CollectionView on our LevelSelectionPage and it will present the LevelPage with the level loaded. There are a couple more steps that we need to complete before the level is actually playable though, first we need to shuffle the board otherwise it is going to be rather easy for the player.
Adding the tile shuffling
In order to shuffle our board we need to open the SlidingTileGrid.cs file and make the following adjustments:
Add the ShuffleTiles method
Let’s add in the ShuffleTiles method so that it can be called once the level has loaded.
private void ShuffleTiles(int numberOfMovements)
{
    var random = new Random();

    for (int i = 0; i < numberOfMovements; i++)
    {
        var possibleMovements = this.tiles.Where(t => this.emptyTile.CurrentPosition.Distance(t.CurrentPosition) == 1).ToList();

        var randomIndex = random.Next(possibleMovements.Count);

        MoveTile(possibleMovements[randomIndex]);
    }

    this.Invalidate();
}
Our method takes an integer parameter to allow the caller to determine how many times we will move a tile. We will then loop through that number of times and find all tiles next to the emptyTile, randomly choose one of those tiles and move it.
Call the ShuffleTiles method
Now that we have added the ability to shuffle the tiles we now need to invoke it. To do so we just need to add the following lines to the end of the Load method:
if (this.IsEnabled)
{
    this.ShuffleTiles(200);
}
We only wish to shuffle the board if we have the IsEnabled property set to true, otherwise we assume we are in preview mode.
Adding the completion logic
We already have the code to detect whether the tiles are in the correct place and fire the Completed event, this section just involves hooking up that event and presenting something to the user. The first step is to modify the LevelPage.xaml.cs file, so let’s proceed to doing that.
Updating the LevelPage.xaml.cs file
We need to add the following method into our class:
private async void OnSlidingTilesCompleted(object sender, EventArgs e)
{
    await this.DisplayAlert("Congratulations", "Party time", "Whoop whoop");

    await Shell.Current.GoToAsync("..");
}
This method will present an alert to the user and then once the user has dismissed that alert it will navigate back to the level selection page to allow them to choose another level. Of course if we wanted to take this further we could present a nicer level completion screen or popup and provide a way to load the next level for them. For the purpose of this post though I think this is enough.
Now that we have added our method we need to hook this up to the event so let’s open our LevelPage.xaml file and do so.
Updating the LevelPage.xaml file
Inside this file we want to change these lines:
<local:SlidingTileGrid
    x:Name="SlidingTiles"
    AreAnimationsEnabled="True"
    HorizontalOptions="Center"
    VerticalOptions="Center"
    Grid.Row="2" />
To the following:
<local:SlidingTileGrid
    x:Name="SlidingTiles"
    AreAnimationsEnabled="True"
    HorizontalOptions="Center"
    VerticalOptions="Center"
    Grid.Row="2"
    Completed="OnSlidingTilesCompleted" />
This register the Completed event to our new OnSlidingTilesCompleted method.
Taking our application for a test drive
If we run the application we will see the home page, tap on the play button and then select a level it will show following the pages based on whether we are running in light or dark mode.
| Light mode | Dark mode |
|---|---|
 |
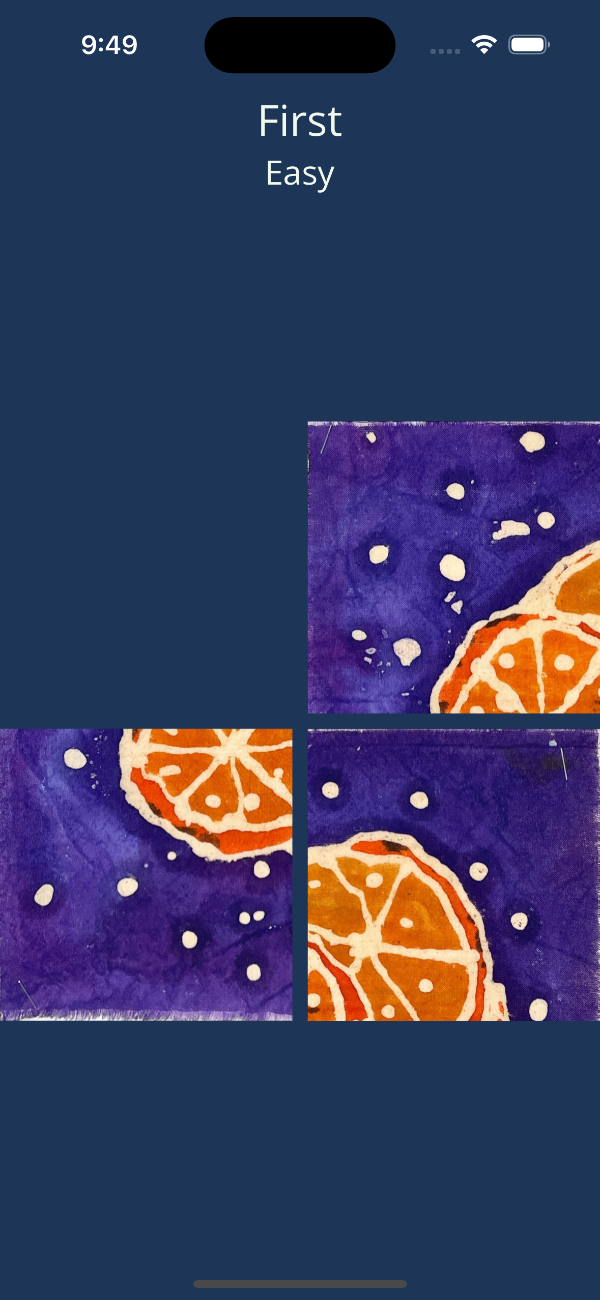 |
What we have achieved
To summarise what we have achieved in this post:
- Created our game page
- Registered our page
- Navigated to our new page
- Added the completion logic
- Taking our application for a test drive
In our next post we will look to add in some animations to finish the app off.
Links
The source for the end of this stage can be found at:
https://github.com/bijington/sliding-puzzle/tree/part-six
| Previous | Next |
|---|---|
| Creating our level selection page | Adding animations |