Building a sliding puzzle game in .NET MAUI - Part four
by Shaun Lawrence
This post is part of the Building a sliding puzzle game in .NET MAUI series that is aimed at guiding you through building a simple sliding puzzle game in .NET MAUI.
This post is also part of the MAUI UI July community series of blog posts and videos, hosted by Matt Goldman. Be sure to check out the other posts in this series!
What we will be covering in this post
- Introducing .NET MAUI Graphics
- Creating our tile classes
- Creating our SlidingTileGrid
- Taking our application for a test drive
Introducing .NET MAUI Graphics
.NET MAUI Graphics is one of my favourite topics! I am currently exploring the idea of building a game engine on top of it given the amount of power it already offers. If you are interested in the game engine then please feel free to check out the repository on GitHub at https://github.com/bijington/orbit.
It has the potential to offer the ability for so much to be achieved, things like rendering chart controls or other fancy concepts all through a cross-platform API meaning we only really need to focus on the problems we are trying to solve and not worry about each individual platform.
Essentially .NET MAUI Graphics offers us with a surface that can render pixel perfect graphics on any platform supported by .NET MAUI. We should consider .NET MAUI Graphics as an abstraction layer, like .NET MAUI itself, on top of the platform specific drawing libraries. So we get all the power of each platform but with a simple unified .NET API that we as developers can work with.
What it offers
.NET MAUI gives us the GraphicsView which we can use to draw shapes on the screen. We need to assign the Drawable property on the GraphicsView with an implementation that can know how to draw. This implementation must implement the IDrawable interface which defines a Draw method.
In order to trigger the application or GraphicsView to update what is rendered on screen we must call the Invalidate method on the GraphicsView. This will then cause the IDrawable.Draw method to be invoked and our code will be given the chance to update the canvas.
Let’s proceed to seeing this in action.
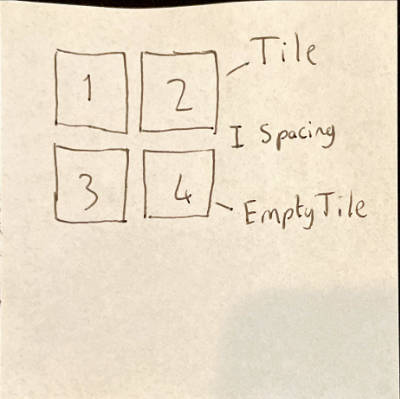
Creating our tile classes
First we need to create some classes to represent the tiles of our game before we build the board containing the tiles.
Creating the Tile class
We need to create the class that will represent a tile in the game. Let’s add that file now:
- Right click on the Puzzler project
- Click on
Add>New File... - Click on
Empty Class - Enter the name Tile
- Click on
Add
We should now have a new file open within Visual Studio. We can replace the contents with the following:
namespace Puzzler;

public class Tile
{
    private readonly Microsoft.Maui.Graphics.IImage image;
    private readonly SizeF imageSize;

    public Tile(Microsoft.Maui.Graphics.IImage image, PointF point, SizeF size, SizeF imageSize)
    {
        this.image = image;
        Size = size;
        this.imageSize = imageSize;
        CurrentPosition = DestinationPosition = point;
    }

    public RectF Bounds => new RectF(CurrentPosition, Size);

    public PointF CurrentPosition { get; set; }

    public PointF DestinationPosition { get; }

    public SizeF Size { get; }

    public float Offset { get; set; }

    public void Draw(ICanvas canvas)
    {
        if (image is null)
        {
            return;
        }

        var x = this.CurrentPosition.X;
        var y = this.CurrentPosition.Y;

        // Calculate any offset based on the TileSpacing defined on the SlidingTileGrid.
        float xOffset = x * Offset;
        float yOffset = y * Offset;

        // Clip the canvas so that we only render the part of the image that this tile represents.
        canvas.ClipRectangle(
            x * Size.Width + xOffset,
            y * Size.Height + yOffset,
            Size.Width,
            Size.Height);

        float imageOriginX = (x * Size.Width) - (this.DestinationPosition.X * Size.Width) + xOffset;
        float imageOriginY = (y * Size.Height) - (this.DestinationPosition.Y * Size.Height) + yOffset;

        canvas.DrawImage(
            image,
            imageOriginX,
            imageOriginY,
            imageSize.Width,
            imageSize.Height);
    }
}
We have added quite a bit into this file so let’s break it down.
We have added properties and a constructor to set them, most relate to representing where on the board the tile currently is, where it should be and sizing/layout related bits of information. The key detail is inside the Draw method. First we calculate where the tile should be rendered taking into account any spacing that should be applied between tiles. Next we clip the canvas so that we only render the part of the image that this tile represents. Finally we draw the image onto the canvas making sure that the part of the image the tile represents is in the correct location.
Creating the EmptyTile class
Next we need to create the class that will represent an empty tile in the game, with a sliding puzzle there is always an empty space otherwise we wouldn’t be able to slide the tiles around. Let’s add that file now:
- Right click on the Puzzler project
- Click on
Add>New File... - Click on
Empty Class - Enter the name EmptyTile
- Click on
Add
The EmptyTile class doesn’t need much of an implementation, its main purpose is to make it easy for us to identify where on the board the space is. We can modify the contents of the new EmptyTile.cs file with the following:
namespace Puzzler;

public class EmptyTile : Tile
{
    public EmptyTile(PointF point, SizeF size, SizeF imageSize) : base(null, point, size, imageSize)
    {
    }
}
This will rely on the logic from the Tile base class that we added previously.
Creating our SlidingTileGrid
We are going to have 2 main usages of our SlidingTileGrid; displaying a preview in the level selection page and then displaying an actual level on the level page. On top of this we want to be able to:
- Provide a spacing amount between tiles.
- Provide the ability to load a level.
- Provide the ability to interact with the board via touch.
- Provide completion logic.
Let’s start by creating the file and then proceeding to satisfy each of the above requirements.
Creating the SlidingTileGrid.cs file
We need to create the class that will represent a board in the game. Let’s add that file now:
- Right click on the Puzzler project
- Click on
Add>New File... - Click on
Empty Class - Enter the name SlidingTileGrid
- Click on
Add
We have a lot to modify within this file so let’s do that step-by-step.
Adding in our fields
We can add in all of the fields that we will need upfront at the root of the class:
private Microsoft.Maui.Graphics.IImage image;
private float imageHeight;
private float imageWidth;
private int horizontalTileCount;
private int verticalTileCount;
private float tileHeight;
private float tileWidth;

private readonly IList<Tile> tiles = new List<Tile>();
private EmptyTile emptyTile;
I believe the purpose of these should either be self explanatory or will become obvious as we continue to use them so I won’t explain that now.
Implementing IDrawable
We should modify the class definition to inherit from GraphicsView and also make our class implement the IDrawable interface.
The class definition should now look as follows:
public class SlidingTileGrid : GraphicsView, IDrawable
By adding the IDrawable interface to our class definition we will need to implement the Draw method that is defined on the interface. We can do this by adding the following method:
public void Draw(ICanvas canvas, RectF dirtyRect)
{
    foreach (var tile in this.tiles)
    {
        // Save and then reset the state of the canvas ahead of allowing a tile to draw.
        canvas.SaveState();
        canvas.ResetState();

        tile.Draw(canvas);

        // Restore back to the original saved state to avoid any left over state from the last tiles drawing.
        canvas.RestoreState();
    }
}
This code will enumerate through all tiles on the board, manage the state of the canvas to avoid any residual state changes affecting other tiles and call the Draw method on the Tile class that we added in the previous section to allow for the actual rendering to take place.
Finally we want to set the Drawable property on our SlidingTileGrid to be itself so it can also be in charge of the rendering, to do this we can modify the constructor to match the following:
public SlidingTileGrid()
{
    Drawable = this;
}
Provide a method to convert LevelDifficulty to an actual Size
Next we need to provide the ability to convert the LevelDifficulty enum that we added in part two into a Size that can represent the numbers of rows and columns in our sliding tile grid. The following method enables us to do this:
public static Size GetLevelGridSize(LevelDifficulty levelDifficulty) => levelDifficulty switch
{
    LevelDifficulty.Easy => new Size(2, 2),
    LevelDifficulty.Medium => new Size(3, 3),
    LevelDifficulty.Hard => new Size(4, 4),
    _ => throw new NotImplementedException()
};
Provide the ability to load an image
One key component of the game is to render the image on screen that will be split into tiles. We only want to load the image once and then share it between our tiles for use in rendering.
Note that in future versions of .NET MAUI we shouldn’t need the #if WINDOWS check and we will be able to solely rely on the PlatformImage.FromStream method to do everything. For now though we need to rely on the W2DImageLoadingService for the Windows platform.
protected Microsoft.Maui.Graphics.IImage LoadImage(string imageName)
{
    var assembly = GetType().GetTypeInfo().Assembly;

    using (var stream = assembly.GetManifestResourceStream(imageName))
    {
#if WINDOWS
        return new W2DImageLoadingService().FromStream(stream);
#else
        return PlatformImage.FromStream(stream);
#endif
    }
}
Provide the ability to load a level
Now that we have the ability to load an image let’s proceed to using that to build our list of tiles.
public void Load(string imageName, Size gridSize)
{
    this.tiles.Clear();

    image = LoadImage(imageName);

    // Divide the dimensions up evenly taking into account the number of gaps between each tile
    imageWidth = (float)this.WidthRequest - (float)((gridSize.Width - 1) * TileSpacing);
    imageHeight = (float)this.HeightRequest - (float)((gridSize.Height - 1) * TileSpacing);

    horizontalTileCount = (int)gridSize.Width;
    verticalTileCount = (int)gridSize.Height;

    tileHeight = imageHeight / verticalTileCount;
    tileWidth = imageWidth / horizontalTileCount;

    for (int x = 0; x < horizontalTileCount; x++)
    {
        for (int y = 0; y < verticalTileCount; y++)
        {
            // If the control is enabled then we allow for interaction.
            if (IsEnabled && x == horizontalTileCount - 1 && y == verticalTileCount - 1)
            {
                this.emptyTile = new EmptyTile(new PointF(x, y), new SizeF(tileWidth, tileHeight), new SizeF(imageWidth, imageHeight));
                this.tiles.Add(this.emptyTile);
                break;
            }

            this.tiles.Add(new Tile(image, new PointF(x, y), new SizeF(tileWidth, tileHeight), new SizeF(imageWidth, imageHeight)));
        }
    }

    foreach (var tile in this.tiles)
    {
        tile.Offset = TileSpacing;
    }
}
In the above approach we are calculating the width of the image, tiles and grid to show on screen and then building the list of tiles. If our control is disabled then we assume we are in preview mode and do not wish to remove the bottom right tile. Finally we set the Offset property on our tiles once the load is completed, this might seem a slightly odd way of doing things given we have just constructed the tiles but don’t worry in future posts we will be animating the load so this code is more a placeholder for that.
Provide the ability to interact with the board via touch
The .NET MAUI GraphicsView provides us with a load of events to allow for the handling of user interaction. For the purpose of our control we only care about the EndInteraction event but if we were to allow for dragging, etc. then we would want to consider the StartInteraction and DragInteraction events.
private void SlidingTileGrid_EndInteraction(object sender, TouchEventArgs e)
{
    if (this.IsEnabled == false)
    {
        return;
    }

    // Detect if the tile can be moved
    var touchUp = e.Touches.First();

    // Each tile in the grid has a position of x, y which represents its current position. We can calculate where our touch is landing and use that to determine whether there is a tile in the location that was tapped.
    var position = new PointF(MathF.Floor(touchUp.X / tileWidth), MathF.Floor(touchUp.Y / tileHeight));

    var matchingTile = this.tiles.FirstOrDefault(t => t.CurrentPosition.X == position.X && t.CurrentPosition.Y == position.Y);

    if (matchingTile is null)
    {
        return;
    }

    // Check if there is any empty tile location nextdoor.
    MoveTile(matchingTile, true);
}

private void MoveTile(Tile matchingTile, bool checkForCompletion)
{
    var distance = this.emptyTile.CurrentPosition.Distance(matchingTile.CurrentPosition);

    if (distance == 1)
    {
        var oldPosition = matchingTile.CurrentPosition;
        var newPosition = this.emptyTile.CurrentPosition;
        this.emptyTile.CurrentPosition = oldPosition;

        matchingTile.CurrentPosition = newPosition;

        this.Invalidate();

        // Check to see if all tiles are in their correct positions.
        if (checkForCompletion &&
            this.tiles.All(t => t.CurrentPosition == t.DestinationPosition))
        {
            this.Completed?.Invoke(this, EventArgs.Empty);
        }
    }
}

public SlidingTileGrid()
{
    Drawable = this;

    this.EndInteraction += SlidingTileGrid_EndInteraction;
}

public event EventHandler<EventArgs> Completed;
To summarise these changes we have:
- Added an event handler into our constructor to handle the end interaction.
- Added a
Completedevent ready for informing any subscribers that the board has been completed. - Added in the
MoveTilemethod that checks where theemptyTileis in relation to the tile that was interacted with, if it is next to it then we swap the two tiles. - Added the ability to calculate where in the grid our interaction was and determine whether it was on a tile.
Provide the ability to set the current level
Now that we have most of the components in place we need a way to invoke the loading from within XAML and more importantly a Binding. In order to achieve this we can add in a BindableProperty called Level as follows:
public static readonly BindableProperty LevelProperty =
    BindableProperty.Create(nameof(Level), typeof(Level), typeof(SlidingTileGrid), propertyChanged: OnLevelPropertyChanged);

public Level Level
{
    get => (Level)GetValue(LevelProperty);
    set => SetValue(LevelProperty, value);
}

static void OnLevelPropertyChanged(BindableObject bindable, object oldValue, object newValue)
{
    var slidingTileGrid = (SlidingTileGrid)bindable;

    if (slidingTileGrid.Height != -1 &&
        newValue is Level level)
    {
        slidingTileGrid.Load(level.ImageName, GetLevelGridSize(level.Difficulty));
    }
}
The OnLevelPropertyChanged is the most complex part here, we are only calling our Load method if our control has dimensions. This is critical due to the fact that we are calculating the sizes of our tiles based on these dimensions.
Load the currently set level once the control has dimensions
The final change for this post sees us overriding the OnSizeAllocated method and calling our Load method if we have a Level set. This allows for us to handle the scenario when the Level property is set before the dimensions are calculated.
protected override void OnSizeAllocated(double width, double height)
{
    base.OnSizeAllocated(width, height);

    if (this.Level is not null)
    {
        this.Load(this.Level.ImageName, GetLevelGridSize(this.Level.Difficulty));
    }
}
Taking our application for a test drive
Just like in part three there are no visual differences so if we run the application we will see the following pages based on whether we are running in light or dark mode.
| Light mode | Dark mode |
|---|---|
 |
 |
What we have achieved
To summarise what we have achieved in this post:
- Introduced .NET MAUI Graphics
- Created our tile classes
- Created our SlidingTileGrid
- Taken our application for a test drive
In our next post we will look to add in our level selection page.
Links
The source for the end of this stage can be found at:
https://github.com/bijington/sliding-puzzle/tree/part-four
| Previous | Next |
|---|---|
| Creating our home page | Creating our level selection page |